部门最近开发的产品使用的开发服务器是 Jetty(挂载在 GWT 中),启动方法是通过 Eclipse 的 External Tool 执行。我对此表示很好奇,特意在自己电脑下面组建了一个 Jetty 开发环境,发现 Maven 和 Jetty 合作起来非常愉快,现在小记之。
准备 Maven 配置文件
我使用 Maven 推荐的标准 webapp 结构,结构如下,官方文档可以参考 Maven - Introduction to the Standard Directory Layout
- src/main/java
- Application/Library sources
- src/main/resources
- Application/Library resources
- src/main/filters
- Resource filter files
- src/main/assembly
- Assembly descriptors
- src/main/config
- Configuration files
- src/main/webapp
- Web application sources
- src/test/java
- Test sources
- src/test/resources
- Test resources
- src/test/filters
- Test resource filter files
- src/site
- Site
- LICENSE.txt
- Project’s license
- NOTICE.txt
- Notices and attributions required by libraries that the project depends on
- README.txt
- Project’s readme
使用的 pom.xml 主要添加了 build-
plugins 的 Jetty 插件,另外修改了 outputDirectory,从而实现自动编译到targert/projectName/WEB- INF/classes目录,实现 Eclipse Hot Code。
<?xml version="1.0"?>
<build>
  <directory>${project.basedir}/target</directory>
  <finalName>${project.artifactId}-${project.version}</finalName>
  <outputDirectory>${project.build.directory}/${project.build.finalName}/WEB-INF/classes</outputDirectory>
  <plugins>
    <plugin>
      <groupId>org.apache.maven.plugins</groupId>
      <artifactId>maven-eclipse-plugin</artifactId>
      <version>2.7</version>
      <configuration>
        <sourceIncludes>
          <sourceInclude>*</sourceInclude>
        </sourceIncludes>
      </configuration>
    </plugin>
    <plugin>
      <groupId>org.apache.maven.plugins</groupId>
      <artifactId>maven-plugin-plugin</artifactId>
    </plugin>
    <plugin>
      <groupId>org.apache.maven.plugins</groupId>
      <artifactId>maven-compiler-plugin</artifactId>
      <configuration>
        <source>1.6</source>
        <target>1.6</target>
      </configuration>
    </plugin>
    <plugin>
      <groupId>org.mortbay.jetty</groupId>
      <artifactId>maven-jetty-plugin</artifactId>
    </plugin>
  </plugins>
</build>
准备几个测试用的 Servlet,外加 web.xml。运行mvn install即可在 target/war 下面生成 war 包,同时在 target/projectName/ 下会生成项目文件。
如果有 m2eclipse,那这个动作很容易就可以完成,如果没有,也可以参照我之前的在 Eclipse 中使用 Maven。
撰写 Eclipse External Tool
建立可以运行的 Jetty 实例分为两步,建立 Jetty 的 Java Application 和创建 jetty.xml 配置文件。
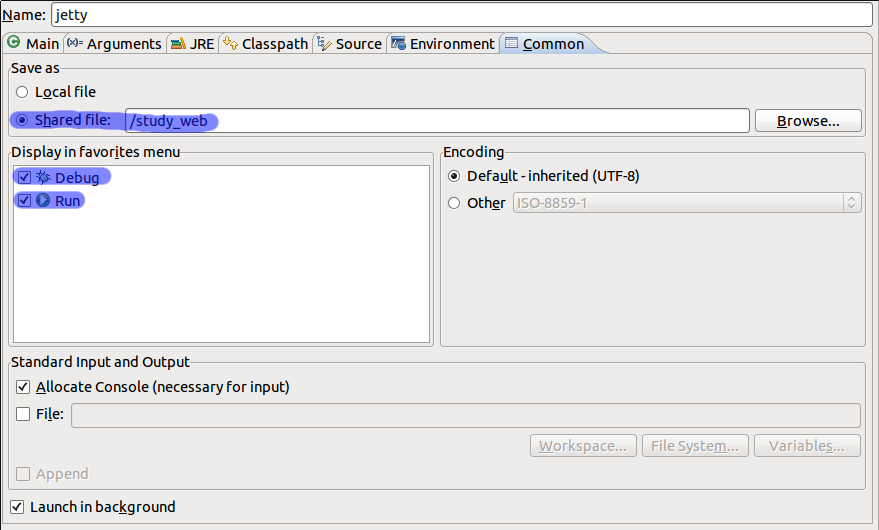
1、在 Run-Run Configurations 中的 Java Application 中建立一个新的应用,起名为"jetty", 使用 Main
class 为org.mortbay.xml.XmlConfiguration,在 Arguments - Program arguments 中加入${p roject_loc}/jetty.xml,其中${project_loc}是动态参数,指向当前项目目录,jetty.xml 为我们随后要创建的 jett
y 配置文件。

如果想将这个应用保存成文件,可以修改 Common - Sava as 到当前目录,就可以保存为 jetty.launch 文件了。(没错,就是 launch 文件,Eclipse 的运行配置文件)
2、准备 jetty.xml 文件
Jetty 是一款轻量形的 Web 服务器,轻到甚至仅仅靠 Maven 插件即可运行,不过我们依然需要通过 jetty.xml 文件进行配置。在项目根目录下建立 jetty .xml(此路径与 Java Application 中的 Arguments 相对应,有些朋友可能更习惯放在 WEB-INF 下面)。
官方说从 $JETTY_HOME/webapps/test/WEB-INF/jetty-web.xml 可以取到 jetty-xml 的范例,我这里就提供下载好了。
点击下载 jetty.xml,这里面写了 hard
code<Set name="resourceBase">./target/study_web-1.0-SNAPSHOT</Set>,请记得替换。
配置好 Jetty 之后,就可以运行 Jetty 了,在 Run - Run As 中找到名为 jetty 的运行命令,不出意外的话,Jetty 会在 4000 端口建立一个实例。
当我们在 Debug 模式运行时,由于我们修改 java 代码会动态更新到 classes 目录,所以我们可以在运行时修改代码,不信你可以在 Debug 时候修改 Servl et 中代码试试,这就是所谓 Hot code。
Enjoy it!
参考文章
天生一对"Maven2+Jetty" – Maven2 创建并管理 WebApp,并使用 Maven Jetty Plugin 在 Eclipse 中调试
目前发现的最好最快的直接在 ECLIPSE 中 JETTY 调试方式
原文链接: Maven 下 Jetty 启动 | Log4D
3a1ff193cee606bd1e2ea554a16353ee
欢迎关注我的微信公众号:窥豹